JekyllCli-intro-EN
An end-user guide for the Windows edition of JekyllCli
JekyllCli User Guide
This is an end-user guide for the Windows edition of JekyllCli. The page names, button labels, and workflows below are based on the current real interface of the app.
1. What the app is for
JekyllCli is a Windows desktop management tool for Jekyll static blogs, with a strong focus on Chirpy-based sites. It splits blog management into 5 main pages:
Dashboard: view post, category, tag, and timeline statisticsManage Posts: search, sort, edit, and delete existing postsWrite Post: write Markdown, preview content, and maintain post metadataBlog Settings: update site information, author profile, navigation tabs, and faviconsApp Settings: switch workspace, theme, language, fonts, update behavior, and writing preferences
2. Before you start
It is recommended to use the app on Windows and prepare the following in advance:
- Install .NET 10.0 Desktop Runtime
- Install Git
- If you want to use the publish workflow, make sure your blog folder is already a Git repository with a configured remote
There are usually two package types:
bundle: best for first-time users, with both the tool and a blog templateminimal: best for users who already have a blog folder; the package mainly containsJekyllCli.exe
3. First launch
When you open the app for the first time, a welcome wizard appears automatically if no valid blog directory is linked yet.
3.1 Choose a blog directory
You can use one of these 3 methods:
Select existing blog directory / folderChoose the Jekyll root folder that contains_config.yml.Use built-in templateIf you downloaded thebundlepackage, you can bind the bundledBlogfolder next to the app directly.Pull from GitHubThe app clones the official Chirpy repository into the parent folder you choose and creates aJekyllBlogfolder by default.
3.2 Choose the language
The first-run wizard currently lets you choose the app language:
中文 (zh-CN)English (en)
If you choose Chinese, the app will also write lang: zh-CN to the blog config and automatically add timezone: Asia/Shanghai.
3.3 What happens after setup
- The app remembers the current blog directory
- Future launches go straight to the main window
- If you need to switch to another blog later, you can do it in
App Settings
4. Main interface overview
In the current version, the left navigation always contains:
DashboardManage PostsWrite PostBlog SettingsApp Settings
If your blog title is already written in _config.yml, the window title updates automatically to show the site name.
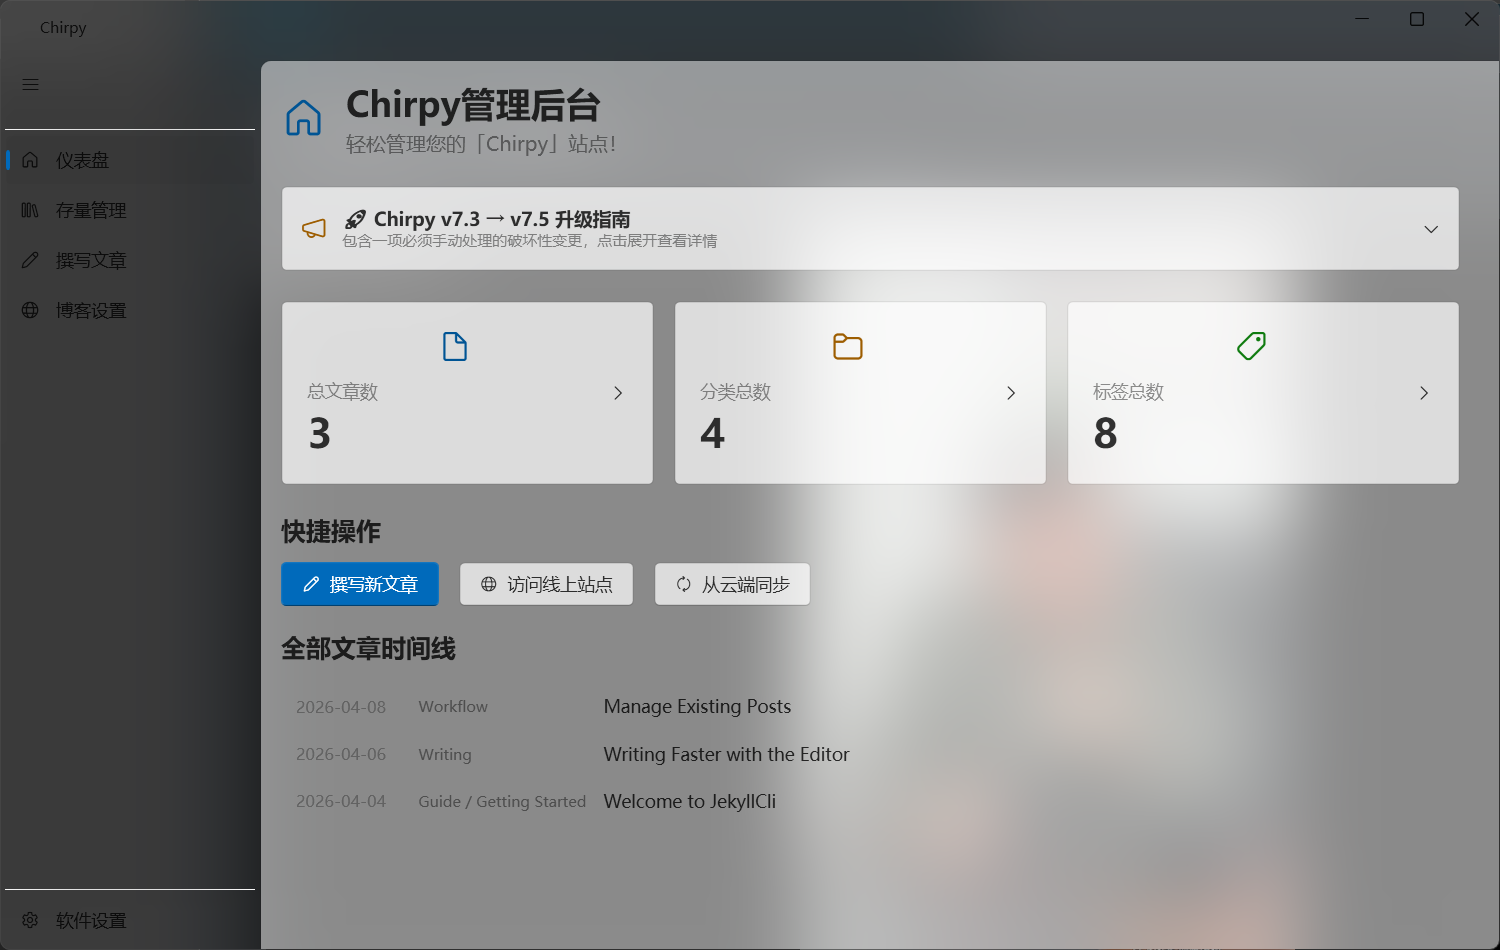
5. Dashboard
Dashboard is the fastest way to understand the current state of your blog.
You can do the following there:
- View total posts, categories, and tags
- Click a category card or tag card to expand the related posts
- Browse the full post timeline and jump straight into editing from a selected item
- Click
Write New Postto start writing immediately - Click
Visit Online Siteto open the blog URL - Click
Sync from Cloudto rungit pull
Notes:
Visit Online Sitedepends on theurlfield in_config.yml. If it is empty, the app shows an error.Sync from Cloudis essentially a Git pull. If the local repository state is abnormal, you still need to fix the Git issue yourself.
6. Manage Posts
Manage Posts is useful for finding older posts, batch maintenance, and content cleanup.
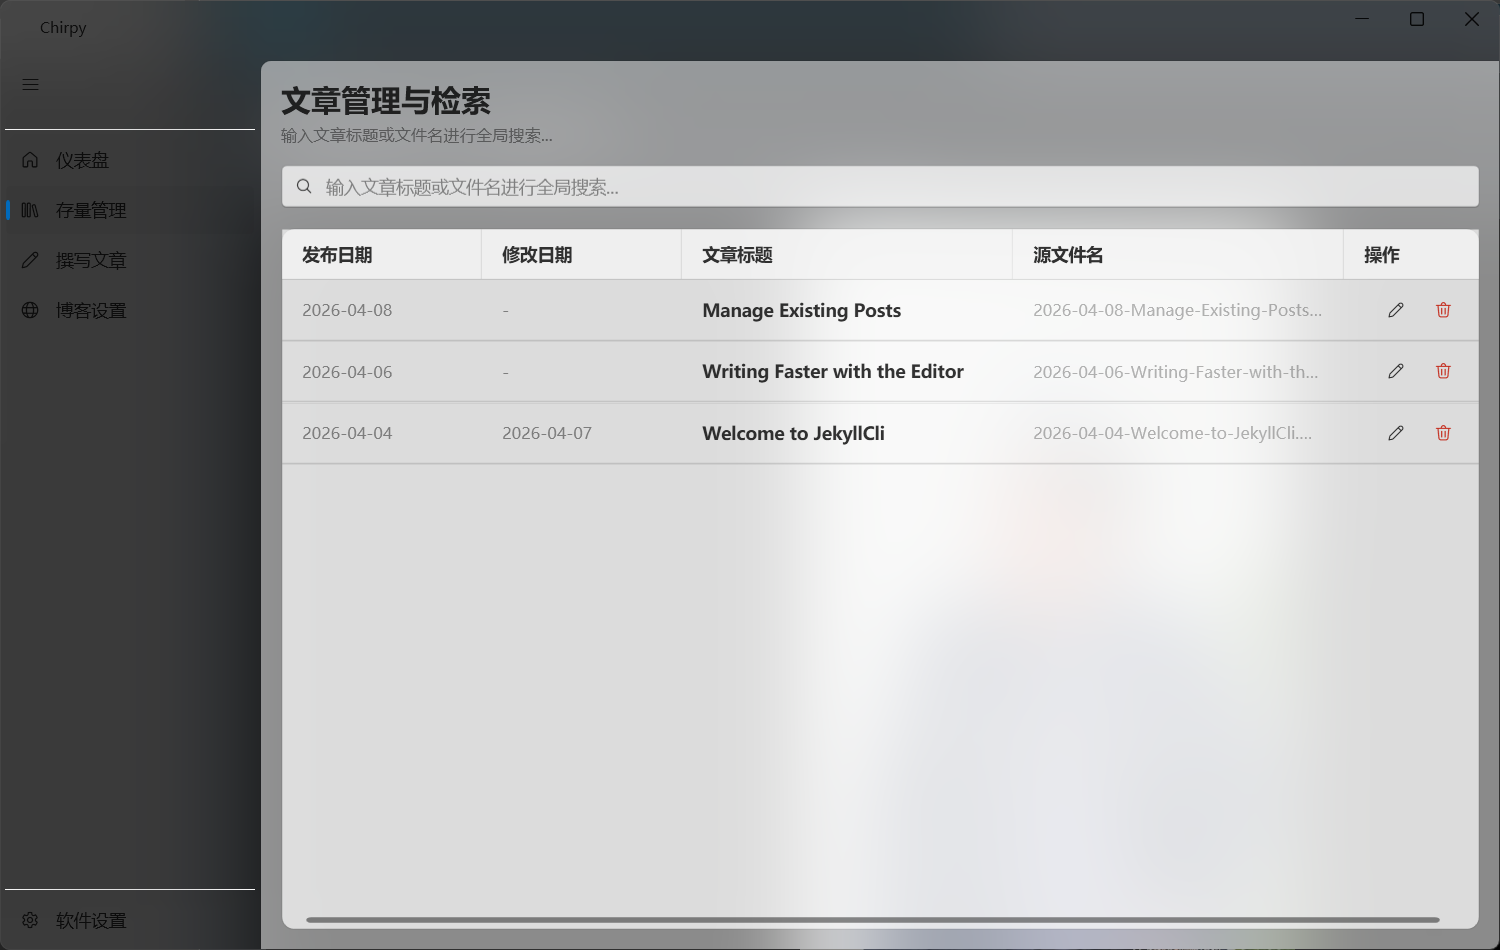
It supports:
- Searching by title or filename
- Sorting by publish date
- Sorting by modified date
- Sorting by title
- Sorting by source filename
- Double-clicking a row to edit a post directly
- Using the action buttons in the operation column to edit or delete
Delete behavior:
- Deleting removes the corresponding Markdown file directly
- A confirmation dialog appears before deletion
- Deleted files are not moved to the recycle bin automatically, so it is best to confirm you have a backup first
7. Write Post

Write Post is the core page of the app for both new articles and edits to existing ones.
7.1 Main writing area
The top area supports these actions:
- Enter the post title
- Switch layout mode:
Write Only/Split View/Preview Only Save as DraftSave and PublishClear and Reset
Layout behavior:
Write Only: only the editor is shownSplit View: the editor is on the left, the preview is on the right, and a shortcut rail appears in the middlePreview Only: only the preview is shown
In split mode:
- You can drag the center divider to resize the editor and preview areas
- Dragging it to the edge automatically switches the page into a single-pane layout
7.2 Post metadata
Open Post Attributes and Metadata Configuration to edit:
- Publish time
- Primary and secondary categories
- Last modified time
- Tags
- Assigned author
- Featured image path
- Math toggle
- TOC toggle
- Pin toggle
- Summary
Tag input tips:
- Press
Enterto submit the current tag and exit input mode - Press
Escto cancel the current input and exit - Press
Backspaceon an empty input box to remove the last existing tag
7.3 Markdown toolbox
The writing page includes a draggable Markdown toolbox above the editor. Common actions include:
- Headings
H1toH4 - Bold, italic, strikethrough, and inline code
- Code block, quote, and divider
- Unordered list, ordered list, and task list
- Insert link
- Insert table
- Insert image
The toolbox supports:
- Collapse and expand
- Dragging to reorder tools
- Pinning tools to the center rail
In App Settings, you can also control whether the original toolbox button stays visible after a tool is pinned to the center rail.
7.4 Links and images
When inserting a link, the app opens a dialog asking for:
- Display text
- URL
- Whether to open in a new tab
When inserting an image, there are two prerequisites:
- The post title cannot be empty
- You need to choose a local image or paste one into the editor
Image handling rules:
- The app generates a directory name from the post title
- Images are saved to
assets/img/inposts/<slugified-post-title>/ - If a filename already exists, the app appends a number automatically to avoid overwriting
- After insertion, the app writes the Markdown image syntax automatically
Besides file selection, the editor also supports:
- Pasting image data directly from the clipboard
- Pasting image files from the clipboard
7.5 Save vs. publish
Save as Draft only performs a local save:
- New posts are created as
_posts/yyyy-MM-dd-title.md - Existing posts keep their original filename
- After a successful save, the page shows a local save success message at the top
Save and Publish continues into the Git publishing flow after the local save:
- Save the current post first
- Run
git pull - If there is no conflict, run
git add . - Create a commit automatically
- Push to the remote automatically
If git pull has conflicts:
- The app prompts you to resolve them manually first
- After the conflict is resolved, click
Save and Publishagain
Additional note:
- The app guarantees “save and push to the remote repository”
- Whether the site is built and deployed after the push depends on your own GitHub Actions, GitHub Pages, or other CI/CD setup
7.6 How modified time is handled
When editing an existing post, if the content changes but you do not manually update the last modified time, the app uses one of two behaviors depending on settings:
- If
Auto-complete modified timeis enabled inApp Settings, the current time is written automatically - If it is disabled, the app asks whether you want to update
last_modified_atduring save
7.7 Leave-page reminder
If the current article has not been saved yet:
- Switching pages triggers a confirmation dialog
- Closing the app also triggers a confirmation dialog
This helps prevent content loss caused by accidental actions.
8. Blog Settings
Blog Settings is for managing the blog itself, not the appearance of the desktop app.
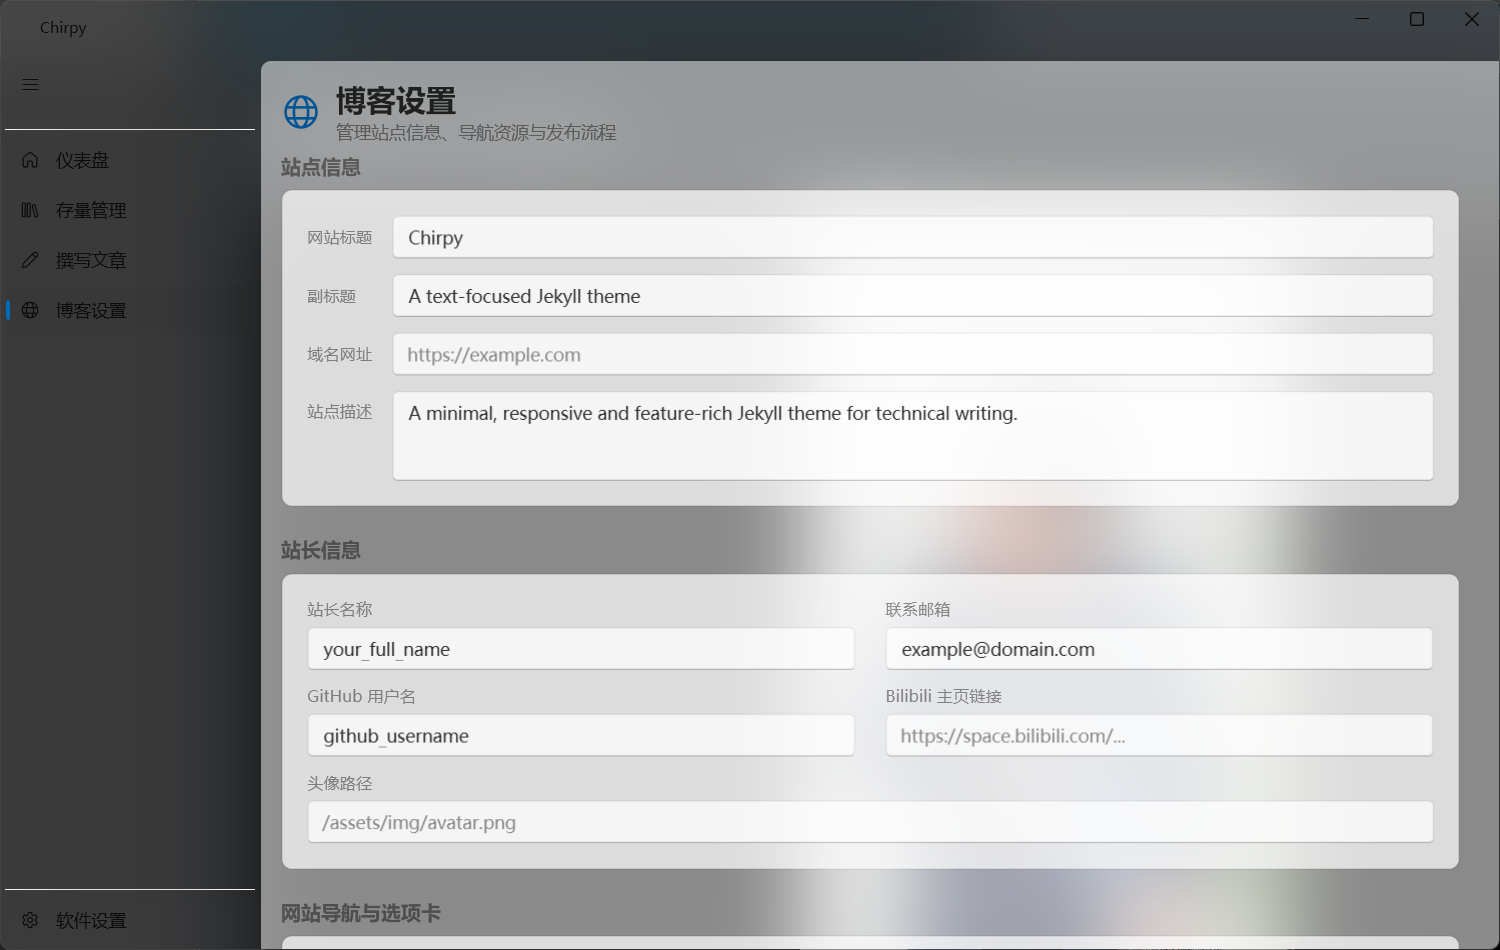
8.1 Site information
You can edit:
- Site title
- Subtitle
- Site URL
- Site description
8.2 Author and social info
You can maintain:
- Author name
- Contact email
- GitHub username
- Bilibili link
- Avatar path
8.3 Navigation tabs
The page currently supports:
AboutArchivesCategoriesTags
You can modify:
- Title
- Icon
- Order
Aboutpage body content
These values are written back automatically to the corresponding blog _tabs/*.md files and configuration files.
8.4 Importing favicon assets
If you are using a newer Chirpy version, it is recommended to regenerate your favicon set by following the current page instructions.
The app already provides two built-in steps:
- Open
Real Favicon Generator - Import the generated favicon files in one batch
During import, the app automatically copies files to:
assets/img/favicons
It also filters out:
site.webmanifest
8.5 Save and publish
The two bottom buttons behave like this:
Save to Local: only writes local config filesSave and Publish: writes locally, then commits and pushes automatically
A practical workflow is:
- Save locally first for small changes
- Publish after you confirm everything looks right
9. App Settings
App Settings controls how the tool itself behaves.

9.1 Workspace
You can switch the blog root directory here.
The rule is simple:
- The target directory must contain
_config.yml
After switching, the app reloads the current blog context immediately.
9.2 Writing preferences
There are 3 practical toggles here:
Remember metadata expansion stateKeep original toolbox item when pinned to center railAuto-complete modified time
If you often write long articles, enabling automatic modified time updates usually makes the workflow smoother.
9.3 Appearance
You can adjust:
Follow System/Dark/Lighttheme mode- App language
- Global font
The current version includes built-in Chinese and English resources, and the font list is read directly from the system fonts.
9.4 Update center
Here you can:
- Check for updates manually
- Enable silent updates
- Jump to the GitHub project page
Update behavior:
- The app performs a delayed update check after startup
- If a new version is available, it can be downloaded directly in the app
- After the download finishes, you can choose to replace the app and restart immediately
- If silent update is enabled, the downloaded update is applied automatically
10. Recommended workflows
10.1 First-time use
- Launch the app
- Bind a blog directory in the welcome wizard
- Go to
Blog Settingsand fill in the site title, URL, and author info - Return to
Write Postand create your first article - Click
Save as Draftfirst - After checking everything, click
Save and Publish
10.2 Editing an old post
- Open
Manage Posts - Search by title or filename
- Double-click the post to open the editor
- Update the content or metadata
- Save or publish
10.3 Updating site configuration
- Open
Blog Settings - Update site information, the About page, or favicon assets
- Save locally first and check the result
- Publish after confirmation
- If you have already written posts with JekyllCli but are not sure how to put the site online, see this deployment tutorial: Host your Jekyll blog for free with Cloudflare Pages.
11. FAQ
11.1 “Invalid directory, must contain _config.yml”
This usually means the selected folder is not the Jekyll root directory. Please choose the folder that directly contains _config.yml.
11.2 Visit Online Site does not open the website
Fill in Site URL in Blog Settings first. The app reads the url field from _config.yml.
11.3 The app asks me to enter a title before inserting an image
That is expected. The app needs the post title to create the image directory, so enter the title first before inserting images.
11.4 Publishing failed
Common causes:
- Git is not installed on this machine
- The remote Git authentication is not configured correctly
git pullhas a conflict- The current blog directory is not a Git repository that can be pushed normally
It is recommended to confirm git status, git pull, and git push work in the terminal before returning to the app.
11.5 Update check failed
The update feature depends on GitHub Releases and the current network environment. If GitHub is temporarily inaccessible, checking for updates may fail and you can try again later.